
10 Things to Do Before Hiring a Plastic Mold Maker Part 1
Hiring a plastic mold maker and having tools made is a lot less scary when you start with the right information. Molds can be very complex and expensive. After the tools are produced, they are basically set in stone—or steel, as the case may be. They have been engineered and cut into hardened steel, so they can’t just be modified.
Following is Part 1 and the first 5 of the 10 essential things you should know or do before talking to your plastic mold maker.
1.Know your material specs
Your DFM (design for manufacturing) engineer should have specified the exact kind of plastic that your parts will be made of. Not all plastics are the same, and many types will need to be molded in tools built out of a specific type of metal.
For example: You may get away with building aluminum molds for simple PP or HDPE parts but polycarbonate is a very hard material. All it takes is one part hanging up during ejection and having the mold close on it, and you could be looking at very expensive repairs or, in some circumstances, having to build an entirely new tool.
PVC is another example: Most people don’t know that this common household material is very corrosive to metal and should be molded only in stainless steel tools.
Not all materials will shrink, heat, or cool at the same rates. The tool designer will have to consider this when designing your molds to make sure that they run as quickly and efficiently as possible. Just a few seconds longer to make your parts could result in thousands of dollars’ worth of extra costs to produce your product over the life of the tool.
2. Get accurate production estimates
To determine how many cavities your mold will have, you should have a close estimate of the number of parts you will be running at the start of your production and you should know what your long-term production goals are.

A Plastic Injection Mold with two cavities and a hydrolic unscrewing mechanism.
What is cavitation? It’s the process of creating cavities, the areas cut or burned in the mold where your parts are made. The more cavities your mold has, the more parts it will make per injection cycle.
Injection molding companies calculate their charges by a fixed hourly rate per machine plus the raw plastic material cost per unit. So, the more cavities your mold can produce, the more you will produce per hour, which will lower your cost per unit.
This is a balancing act: The larger the mold, the larger the machine you will need to run it. Larger machines generally cost more per hour. Also, the more cavities a mold or tool has, the more expensive it will be to build.
Be aware that the cavitation of a tool is usually 1 or an even number of cavities into your mold so the plastic disperses evenly into each part. Common configurations are 1, 2, 4, 8, 12, and 16 cavities.
It will be up to you to choose the right combination of cavitation, mold cost, and per-piece cost for your budget and production goals. If you build too large a mold, your up-front investment may be unnecessarily high. But build one that’s too small, and you may need to build another tool in the future to keep up with demand. Remember, building a mold is not a quick process and can take anywhere from two to six months.
3. Determine whether you need a prototype or full production mold
A prototype mold may be necessary when the product is still in the prototype stage but needs production-quality parts in large enough quantities to justify the investment. Many times, this is done to show investors that a market exists before scaling the project.
A company or startup may invest in a one- or two-cavity prototype mold made of aluminum or other inexpensive material to test their concept. As 3D-printed prototype molds become more common, testing a concept is becoming more economical.
Be aware, however, that prototype molds still cost thousands of dollars to build and can produce a very limited number of parts.
We have seen many customers request prototype molds to save on the initial investment but then continue to produce long after the molds have ceased to function properly. This is frustrating for both the client and the molder: The molder has to spend more time to produce parts that meet the customer’s standard, drastically raising the per-unit price.
A full production mold is worth investigating, as it will not cost much more than a prototype mold but will be able to produce quality parts for many years or hundreds of thousands of cycles.
4. Quoting tooling is not easy or quick
This is why investing in DFM is so important. Your DFM engineer will determine the mold sizes and complexity of the tool needed and will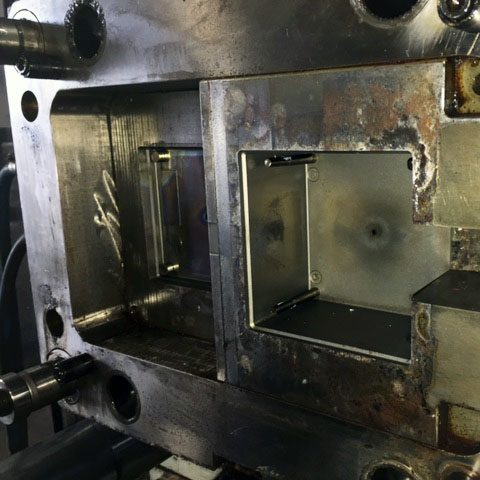 communicate with both the molder and the plastic mold maker throughout the process.
There is a lot to consider when molds are quoted, so making sure you know what your parts will do and need before sending out RFQs will save everyone a lot of unnecessary work.
We do have patience and understand that changes in the parts may come up, but there are limits to the number of iterations you can do when getting tooling quotes.
Please have patience during the process, as we will with you. As the saying goes, “Help me help you.”
5. Producing tooling is not easy or quick
Most tools can take anywhere from 60 days to six months to make. The total production time will depend on how quickly the approval process goes, how complicated and large your mold is, and how many projects the plastic mold maker currently has in production.
In a future article we go through the mold production timeline in detail.
As you can see there is a lot to think about when considering building a tool. Here is a run-down of five points we’ve touched on so far:
-
Know your material specs.
-
Get accurate production quantity estimates.
-
Determine whether you need a prototype or full production mold.
-
Be patient while waiting for a mold quote.
-
Remember that building tools takes time, two to six months.
6. Does your plastic mold maker recommend a hot-runner or cold-runner system
When parts are injection molded, the heated plastic is injected from the barrel through the sprue or initial opening in the mold and then passes through canals called runners, which lead to the cavities. When the sprue and runners are kept hot, waste is reduced and often the parts are aesthetically more appealing.

Plastic Mold Design
With a “sub-gated” cold-runner configuration, these channels are allowed to cool with the part. The runner waste is cut from the parts when ejected, by hand or by robot, and then recycled or discarded.
A hot-runner system may seem ideal, but the expense and maintenance of this system can make it cost prohibitive. Hot-runner systems, at times fail, which can result in expensive down-time and increased production costs.
The plastic mold maker should be able to advise you on which system is optimal for your project, so you can decide what best fits your situation.
7. Will your tool design require a secondary process—and will it add significantly to your cost of goods sold?
Building a tool is really the first manufacturing investment you’ll make, so you need to understand the ripple effects it may have further down the production line. Following are some common considerations related to tool design.
Semi-automatic or operated tools
Whenever possible, your parts and the molds for producing them should be designed to run automatically. Avoiding designs that require a human operator or robot will help keep your costs down. Not all parts can be produced with a robot, especially short-run products, as a robot takes time and skilled labor to set up.
In the United States, we have been spoiled over the years by inexpensive manual labor overseas. Rising labor costs at home and abroad, transportation costs, lead times, and the growing desire to make products locally are forcing product developers and engineers to focus on automation in domestic production.
Let’s say your factory costs are $50 an hour. You have an automated process and can produce 500 parts per hour with a 29-second cycle. Your total cost per part would be $0.10. Now, if you have a semi-automatic process and have to add a factory worker who makes $12 per hour to stop the machine after every cycle, your cycle time increases by 15 to 20 seconds. Your factory cost is now $62 an hour, but you’re producing only 293 parts per hour. Your price per part is now more than $0.21.
If your product has been smartly engineered, automation is possible and worth the added investment.
Post-production assembly
As with automation, a larger up-front investment in tooling will help you avoid complex secondary processes and save money on the final part cost.
Some assembly is simply unavoidable, but you can coordinate with your Plastic Mold Maker and Design for Manufacturing Engineer to set up an efficient process and have a clear vision of the path your parts will take to get from raw material to final packaged product. Assembly is also labor intensive and many times can double your costs. Sometimes you need to combine one assembly process with another to increase efficiency.
Some common secondary processes for injection- molded parts are:
– Sonic welding twot halves together
– Screwing two parts together.
– Snap fitting two parts together.
– Solvent welding two parts together (using a solvent to “glue” parts and then placing them in a jig so they bond correctly.
– Trimming runners that weren’t sub-gated or were improperly sub-gated
– Trimming “flash,” small, thin pieces of plastic on the edges, usually caused by a poor process, damaged or improperly built tool, or the use of a raw material in a tool not built for that material (such as PVC in standard steel)
– Adding a third-party part to the final assembly with the injection-molded parts
8. Ask your Plastic Mold Maker if a family mold and can it work for you.

Plastic Mold Maker Design Layout
A family mold is a single tool that makes two or more types of parts. Many times these can be built with a turning sprue shut-off, which means one or more parts can be “turned off” so the operator can choose which parts get made.
There are advantages to this type of mold, one of which is being able to produce many different parts while investing in only one tool.
Some disadvantages are that family molds do not run as efficiently as individual molds and their size can impose cavity limitations. Since your family mold may be larger than an individual mold, you may be paying a higher price for the use of a larger machine while running only some of the parts that your tool can make.
Family molds are also limited by the difference in shape and size of the parts you want to make in them, but they can save you money and are worth considering any time you plan to produce several different parts. Be sure to ask your plastic mold maker about this option.
9. Do you need slides, hydraulics, or pneumatics?
Here are just a few more factors that can affect the cost of building a tool.
Slides
Slides allow a core to get in and out of the mold to create holes, windows, or spaces in more than one side of the final part. They are common but do require more engineering, moving parts, and a larger mold base.
Hydraulic or pneumatic assistance
One situation in which hydraulic assistance may be necessary is when you’re molding internal threads into a part, such as a cap or nut. A hydraulic cylinder is placed on top of the mold and is activated by the injection molding machine to unscrew the threaded metal cores before or after the mold opens and before the part is ejected.
Molds designed for pneumatic assistance are most common with parts that have a small lip that could cause the part to hang on or stick to the movable side of the mold. With pneumatic assistance, the part is ejected with a burst of high-pressure air that blows the part off of the ejector pin or core.
Pneumatic assistance can also be used on the cavity side to break the “vacuum” so the part will release and stay on the core side during mold opening.
10. Does your Plastic Mold Maker ensure quality with SPI and American standards?
We at Aire Plastics ask our mold makers to follow the mold classification guidelines of the Society of the Plastics Industry, or SPI.
These guidelines cover the quality and quantity of cycles that a tool can run before major maintenance issues arise and specify the types of plastics that can be molded in a tool. Following these specifications can help ensure the quality of your finished product.
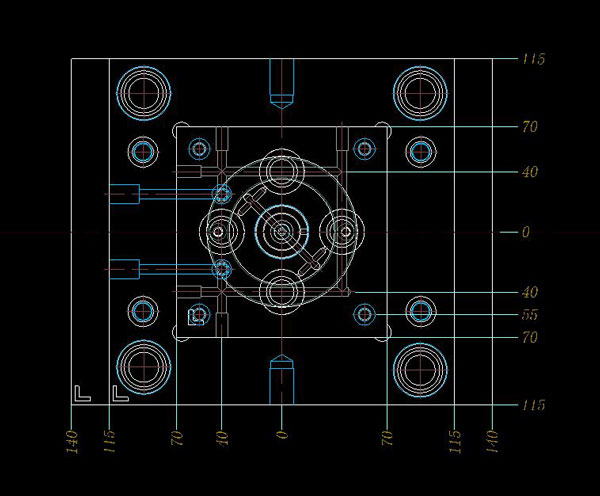
Plastic Mold Maker Design Drawing Layout
When working with molders outside the United States, you need to specify that all components must meet American standards (DME or DME equivalent). Your plastic mold maker is accustomed to these standards which guarantee that the individual parts—such as ejector pins, sprue bushings, nuts, and bolts—can easily be replaced with off-the-shelf parts here in the United States.
Having to have custom-machine something as simple as an ejector pin, or having to order it from China, will cause expensive downtime for your mold. As Murphy’s Law would have it, this type of problem always occurs when you’re trying to meet a tight deadline. An ounce of prevention is worth a pound of production!
Ok. That was a lot of info, I know. So here is the rundown of the top 10 things you’ll do when building plastics tooling.
1. Know your material specs.
2. Get accurate production quantity estimates.
3. Determine whether you need a prototype or full production mold.
4. Be patient while waiting for a mold quote.
5. Remember that building tools takes time, two to six months.
6. Research hot-runner versus cold-runner systems.
7. Learn whether your tool design will lead to costly secondary processes down the production line.
8. Determine whether a family mold work for your project.
9. Find out if you need slides, unscrewing mechanisms, assisted ejection, or other
10. Insist on SPI-class molds and American standards.
You can see that a lot goes into building plastic tooling. If you learn the basics and carefully plan your final product before talking to your plastic mold maker and engineer, that conversation won’t be like sitting in a UN General Assembly meeting without a translator.
Since this will probably be the largest investment that you will have to make to manufacture your parts, making some smart and informed choices at this stage will lead to plastics manufacturing success.
Product development takes guts and persistence. For those about to product develop and manufacture….WE SALUTE YOU!