
How to Take Your Concept Sketches to 3D Models (No Sweat).
Taking your concept sketches to 3D models doesn’t have to be difficult. In the beginning stage of developing your product, the process is about testing your ideas. Here I will share with you, in 4 easy steps, how to take your concept sketches to 3D Models and get it done quickly.
Why do I need a 3D Model Anyway?
As a manufacturer, we need to see every possible detail about your product WITH dimensions to be able to make a viable prototype. Once you have a decent prototype in hand you can test it in the field and with potential customers. If your project is 3D printable it just can’t be done without one! Also, this model will serve as a base for any changes you will have to make down the road. Most changes to a 3D model can be made quickly and cheaply.
Let’s Start with Concept Sketches.
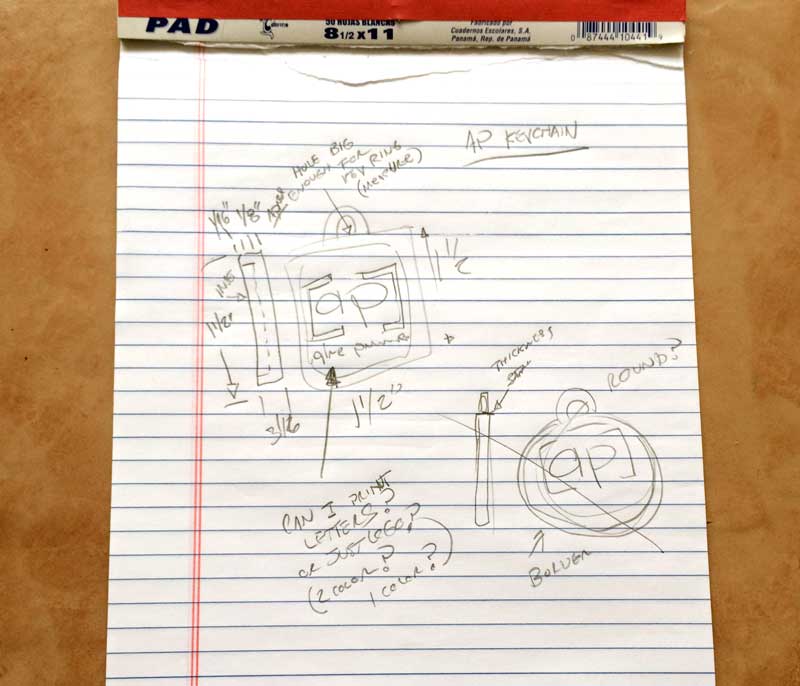
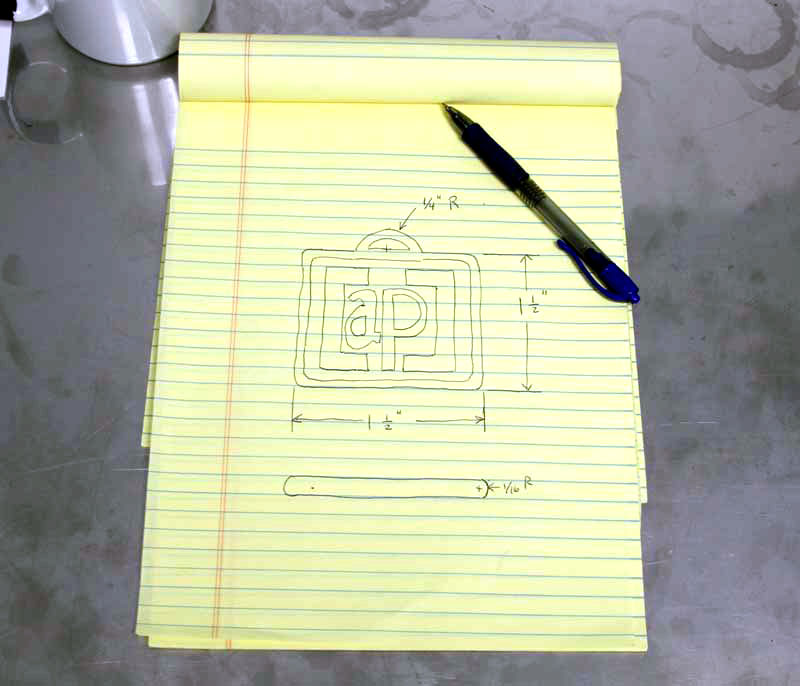
Lighting has struck! The light bulb is fired up! You…Have…A…Great…Idea! You might have jotted it down on a napkin or the back of a receipt with a few crude drawings. That’s what first drafts are for, getting your ideas documented as quickly as possible, now let’s clean it up. I worked as a 2D animator and cartoonist for many years and I can tell you, few artist draw great the first time around. Instead, think of drawing and sketching as a search for just the right look. Just check out how many sketches and other paintings Leonardo Da Vinci did before creating the final Mona Lisa. So, you don’t have to be a super concept artist or have a lot of drawing skills to create precise sketches. Just make sure that they communicate clearly.
The Devil is in the Details.
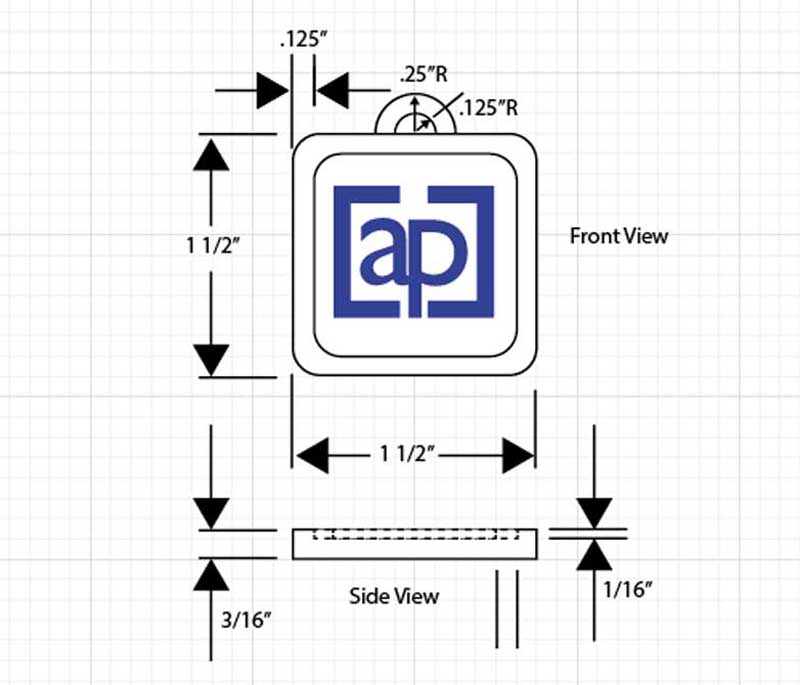
Front View, Back View, Side View, A, B,C…There is no magic number of views and sides that you need to sketch to explain your concept. Just be sure to include all relevant views to show what your product is and how it will work. If your idea includes different moving parts, you will need to sketch the whole mechanism with notes and dimensions AND each part separately. Remember to include every critical measurement or dimension. You can use inches or centimeters, whichever you prefer. If you aren’t sure about an angle or curve, estimate or use your kids’ protractor from school but please show all of the possible dimensions. The 3D modeler or artist will use these to get started but will suggest angles and arcs that are more natural if your measurements aren’t aesthetically pleasing or may be difficult to model.
I like to redraw my ideas and clean them up in Adobe Illustrator to present to clients before having a 3D model made. Of course, this can also be done with a pencil and a ruler.
Concept Sketches Template
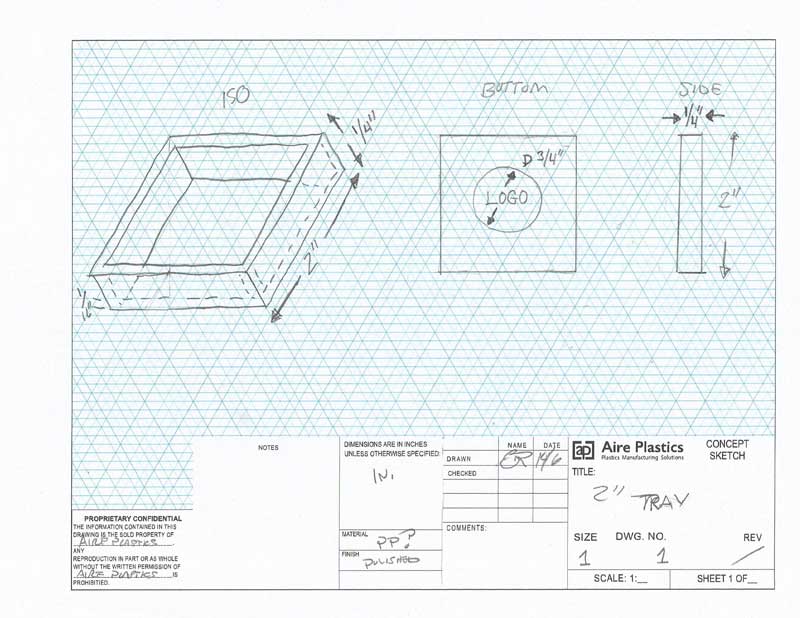
To make this all a little easier, we’ve come up with a Concept Sketches Template! Just print it in full color on standard Letter size paper and use the Isometric Grid to keep your lines straight. It’s great for drawing isometric views of your product concept as you can see in the example below.
Draw your lines lightly with a pencil and then darker with a ruler. Clean up with an eraser and “Tadaah!” you’ve got great concept drawings to scan and send to your favorite 3D artist. We’ve even included fields for revisions, etc to keep your various concept sketches organized.
Finding and working with 3D artists
Now that your concept sketches are ready, let’s find some 3D artists! It used be difficult to find artists who are experts in 3D technical drawings. I spent years in college learning AutoCad (insert emoji with gun to the head here). But now days it’s very easy to find skilled 3D artists all over the world who will work at a very reasonable price ($30-$150 per job depending on the complexity of your project).
You can try job boards like Freelancer or Upwork. I personally have worked with both and have settled on Upwork just because I am now more familiar with it but both work great. Don’t be intimidated by the hoops you have to jump through to register and build your account. Just take it step by step. All of these details are in place to make your hiring experience easier as you work with freelancers. Also, it IS safe. You simply pay from PayPal or a Credit Card through an escrow account which Upwork provides. I personally can recommend Oleksandr Kodak from Ukraine but you can interview and hire based on your needs.
Deliverables
I recommend to ask for your files to be built in Solidworks or compatible formats (.STEP, STL). SolidWorks is super-fast and flexible. The file types it produces can easily be converted to work with the vast majority of 3D printers. Also, ask for the 3D artist to send you .jpg files for each angle. Solidworks has a feature where the artist can produce 2D images of each angle with dimensions. These drawings will look a lot like traditional drafting drawings (I’m not sure if that is a real term but I think you get my drift).
Keep these 2D drawings safely stored along with your 3D drawing files. In my experience, most people are horrible about organizing and storing their files. Manufacturers and 3D artists are not a cloud storage company and are only responsible for your files until they are delivered and paid for. This is your baby! Take it home and show it some love!
Recap and Final Notes
Just to go back over the steps:
- Quick sketches of brainstormed ideas
- “Clean-up” drawings on 8.5” X 11” white paper with clearly defined dimensions.
- Check and Re-check your concept sketches to make sure you have provided all angles of your project and all critical dimensions as close as you can get them without being an engineer.
- 3D Model (ask for files in STEP AND STL file types AND 2D renders of each angle and part (jpg).
Remember, these first draft 3D models ARE NOT production designs. We have people come to us all the time saying that their project is ready to produce but really just have “design drawings” for basic function and aesthetics. Design for Manufacturability or DFM is a “whole ‘nother” process. These first concept sketches and 3D drawings are still a very important first step to developing your product.
We’ll tackle the different kinds of prototypes you will need to build and how to get them made quickly and efficiently in near-future articles. Feel free to comment below or send us an email if you have any questions. You can write me at jasonpost@aireplastics.com or contact our team at contact@aireplastics.com Happy Product Developing!